Low cost vegetable garden from your lawn – design tips
Author : My Food Garden
Low cost vegetable garden created from your lawn, if you have grass, is the easiest and most cost effective way to get started with your vegetable garden or expand an existing vegetable garden. Here are my design tips which expand on the short movie I did a few weeks ago about a new vegetable and herb garden at our place.
Location
- Sun – For southern hemisphere gardeners, having open exposure to the sun in the north is very important, especially if you live in a warm temperate or sub tropical climate when a very large variety of food grows well over our “winter” months when the sun is more in the north (from April to September). The opposite is the case for northern hemisphere gardeners, ie open exposure to the south from October to March.
- Drainage – Be sure the space for your low cost vegetable garden has good drainage, either on a flat space or with a gentle slope. Aim for a space where you do not need to retain the garden beds due to the slope.
- Tree roots – Keep as far away as possible from tree roots and if you can’t avoid them then put in root guard around the garden area. This is lots of digging and sometimes it has to be done as I well know from my own experience of our one of current gardens.
- Expandable – Choose an area where it is more likely you can progressively expand the garden space as you get more into your low cost vegetable garden.
- Healthy grass – If the grass is growing well, you should expect some soil underneath and good light conditions
Preparing the space
- Check underneath – With ideal location for your low cost vegetable garden decided, get a sharp bladed shovel and dig a small hole in the space to the depth of the shovel. This will tell you what to expect of the soil underneath. Be aware of any underground services before you start this and as you prepare the area
- Garden size – Always a tricky decision as its based on what space is available that is ideal and what you can manage with your time availability and skill level. Everyone is different but I feel its always best to plan big and start small
- Clear space – Cut the grass very short and then chip off grass with a hoe. If its a large space you may choose to use a rotary hoe, but remember its a low cost vegetable garden so I suggest getting a sharp bladed hoe or pick and get some exercise clearing the space. I do not suggest putting the grass layer upside down back onto the space which is a common recommendation with permaculture. My experience is that this approach makes the grass grow back and I am not into using cardboard to kill grass since it introduces chemicals into the soil and makes it harder to improve your base (which is a key principal of the low cost vegetable garden method).
- Loosening the soil – Once you have the grass off the space, you can see clearly what you have underneath, then use you pick to loosen the soil to the depth of a 15 cm. hopefully its not rock.
Improving the soil
- If you have some loamy soil as a base, improve as follows:
- Minerals – add handful of gypsum to m2, handful of dolomite to m2, handful of wood ash and very finely crushed rock dust to m2. Its important that the beds have sulphur (in the gypsum), calcium (in gypsum and dolomite), silica and boron (in rock dust) as the first minerals
- Living organic substance – sea fertiliser (I prefer biodynamic seaweed and fish emulsion), manures (I prefer well chopped cow manure). This gives nitrogen, phosphorous and potassium in a living state as well as trace elements
- Order – Mix in minerals and living substance over whole space whilst its flat and the next step is to create the beds.
- If you very little soil, you will need to bring some soil in from another source, make sure its good quality, spread it evenly over the space and then use the same improvement process described above for soil you have bought unless you are absolutely certain it is great quality.
Bed preparation
- Make your beds about 70 cm wide and paths the same width. With your flat bladed shovel, dig your paths and throw that soil up onto the beds so that you are creating beds which are raised by about 20 cm. This should give you a bed depth of 20-30 cm which is ideal.
- With the paths, fill them with mulch and over time that mulch will break down and creating more soil which can be thrown up onto the beds at the end of the season.
Soil management
- If your base is quite poor I suggest growing a green manure crop as the first step. More information on this process can be found here.
- Use regular application of organically based liquid fertiliser. I use biodynamic soil conditioners, plant based liquid manures and cow manure teas I make
- Apply compost when you plant, use crop rotation for each bed and include a green manure crop after every 4 crops.
Summary
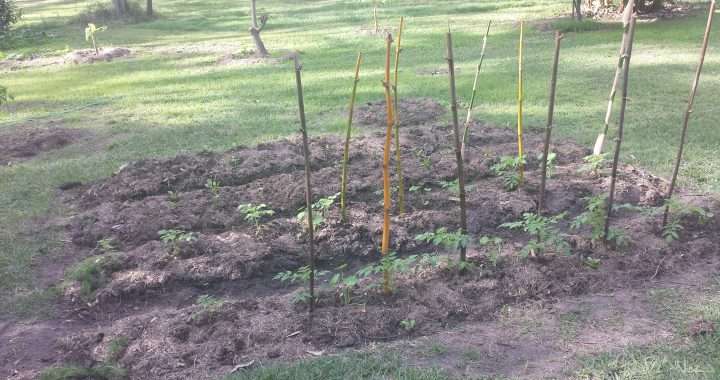
None of the ingredients mentioned above cost much and you have the flexibility in a garden without hard borders to create whatever shape you want. In the short movie, I created the bed area of 16 m2 in 2 sessions of about 2 hours each. Two weeks later I started planting it out and you can see from the picture above, it has tomatoes, nasturtium and a mixture of greens and leeks growing together already, only 3 weeks after starting the process. Not bad for a low cost vegetable garden and I can keep expanding this patch into the space.
Come along to one of our Workshops or talk to us about our Coaching service.
Authored by Peter Kearney – www.beta.myfoodgarden.com.au